
First aid is the provision of initial care for an illness or injury. It is usually performed by a lay person to a sick or injured casualty until definitive medical treatment can be accessed. Certain self-limiting illnesses or minor injuries may not require further medical care past the first aid intervention. It generally consists of a series of simple and in some cases, potentially life-saving techniques that an individual can be trained to perform with minimal equipment.
aims of first aid
- Preserve life – the overriding aim of all medical care, including first aid, is to save lives
- Prevent further harm – also sometimes called prevent the condition from worsening, this covers both external factors, such as moving a patient away from any cause of harm, and applying first aid techniques to prevent worsening of the condition, such as applying pressure to stop a bleed becoming dangerous.
GOLDEN RULES OF FIRST AID
- Do first things first, quickly-quietly without fuss or panic.
- To assess the situation be calm, give confidence, talk to him/her, listen to her/him and reassure her/him.
- Check ABC Rule.
- Give artificial respiration if breathing has stopped.
- Stop bleeding if any.
- Treat for shock.
- Do not attend too much.
- Do not allow people to crowd around.
- Don’t remove clothes unnecessarily.
- Arrange for transportation of the casualty.
First Aid for Cuts and Scratches

Things You’ll Need
First and foremost, know when to seek medical attention:
If your injury involves any of the following, contact a doctor:
The cut is deep
The cut is long. Long cuts are considered to be approximately 1 inch when on the hand or foot and 2 inches when elsewhere on the body.
The cut is jagged.
The injury involved a pet, especially a cat.
The injury involved a wild animal.
The injury is due to a bite, either human or animal.
The wound has debris stuck in it after cleansing.
The wound is bleeding heavily.
The wound will not stop bleeding after applying direct pressure for 10 minutes.
The injury is a puncture wound.
Also contact your doctor if you are overdue for a tetanus booster. For minor cuts, scratches and scrapes, be sure you have had at least three tetanus shots before the injury and you are within 10 years of your last booster. For more serious cuts, be sure you have had three tetanus shots before the injury and you are within 5 years of your last booster.
Step 2
First aid when very little bleeding is involved:
If a cut, scratch or scrape is minor and has very slight bleeding, the best first step is to clean the wound.
Rinse the cut, scratch or scrape under running cool to lukewarm water. If the cut is in an area too difficult to get under a faucet, fill a clean cup or bottle with water and pour it over the wound.
Use only mild soap, gently applied with a gauze pad or soft, clean cloth, when cleaning a cut, scratch or scrape. Be sure to remove all soap from the wound by rinsing thoroughly. Do not use strong soaps when providing first aid to a cuts, scratches or scrapes, as they can cause additional irritation to the injured area. Under no circumstances should you use strong cleansers or detergents, such as bleach, to clean your injury.
Step 3
First aid when there is bleeding involved:
If a cut is minor and bleeding a little more heavily, your first step is to apply direct pressure to aid the blood in clotting. Use gauze or a clean, soft cloth and apply firm, but gentle, pressure for several minutes. Elevate the injured area above the level of your heart whenever possible. If the blood begins to soak through the material, do not remove the gauze or cloth. Simply place another piece of gauze or cloth on top of the one you are currently holding and continue to apply pressure.
Cuts on the head, face and mouth usually bleed more heavily than minor cuts elsewhere on the body due to the large number of blood vessels contained in these areas. Do not be alarmed. Keep applying pressure until the bleeding stops.
Once the bleeding is under control, gently remove the cloth and begin cleansing the wound as outlined above. Bleeding may start again during the cleansing process. Use another clean cloth or gauze pad to apply pressure again when you are done cleaning the wound.
Step 4
First aid when debris is involved:
Many scrapes will have debris, such as gravel, sand or wood chips, embedded in them. Increase the strength of the stream of the cleansing water to dislodge as much debris as possible. Use a set of tweezers which have been thoroughly cleaned with rubbing alcohol to remove any debris that remains at the surface. Do not dig for any deeply embedded items. Do not use brushes or rough washcloths, as doing so will cause more damage to the skin and increase the risk of infection. If you cannot remove all the debris, seek the help of a medical professional.
Step 5
First aid with an antiseptic:
Hydrogen peroxide or other antiseptics are not needed for all wounds. Cleaning a cut, scrape or scratch with hydrogen peroxide causes additional irritation to the injury and can potentially kill off healthy cells needed for healing. Thoroughly cleaning the wound as described above is usually enough. If the cut, scratch or scrape occurred in a very dirty place or while handling items such as raw meat, a little hydrogen peroxide during the initial cleaning may be warranted. Be sure to rinse thoroughly to prevent continued irritation.
Step 6
First aid using adhesive bandages:
Opinions differ as to whether all cuts and scratches need to be bandaged. If the cut or scratch is in an area that will not become dirty, it is fine to leave it uncovered. Apply a topical antibiotic cream a couple times a day to keep it moist and fight infection.
If the cut or scratch is on an area that will easily become dirty (a hand or foot) or an area that will be irritated by clothing (a knee), apply an adhesive bandage or gauze and medical tape. Continue to use a bandage in these areas for 7 to 10 days, or until the injury is well healed.
Due to the fact scrapes dry out easily and can cause scarring, bandages are generally recommended for them. Extra large adhesive bandages are available in stores. You can also use sterile gauze and medical tape to cover the area.
Bandages hold in moisture, which aids in healing. This same moisture also provides the perfect breeding ground for any bacteria left in the wound. Always use a topical antibiotic cream when using a bandage. Change the bandage daily, or if it becomes wet or dirty. Reapply the antibiotic cream with each bandage change.
Step 7
Follow up to first aid:
Watch your cut, scratch or scrape for any sign of infection while it heals. Contact your doctor if you see any signs of infection or if the wound looks odd to you in any way. Signs of infection include:
Pain in the wound or in the surrounding area
Redness and warmth around the wound
Swelling in the area of the wound
Pus draining from the injury
Red streaks form around the injury
Fever
- Water
- Soap
- Antibiotic cream
- Adhesive bandage
- Antiseptic (optional)
First and foremost, know when to seek medical attention:
If your injury involves any of the following, contact a doctor:
The cut is deep
The cut is long. Long cuts are considered to be approximately 1 inch when on the hand or foot and 2 inches when elsewhere on the body.
The cut is jagged.
The injury involved a pet, especially a cat.
The injury involved a wild animal.
The injury is due to a bite, either human or animal.
The wound has debris stuck in it after cleansing.
The wound is bleeding heavily.
The wound will not stop bleeding after applying direct pressure for 10 minutes.
The injury is a puncture wound.
Also contact your doctor if you are overdue for a tetanus booster. For minor cuts, scratches and scrapes, be sure you have had at least three tetanus shots before the injury and you are within 10 years of your last booster. For more serious cuts, be sure you have had three tetanus shots before the injury and you are within 5 years of your last booster.
Step 2
First aid when very little bleeding is involved:
If a cut, scratch or scrape is minor and has very slight bleeding, the best first step is to clean the wound.
Rinse the cut, scratch or scrape under running cool to lukewarm water. If the cut is in an area too difficult to get under a faucet, fill a clean cup or bottle with water and pour it over the wound.
Use only mild soap, gently applied with a gauze pad or soft, clean cloth, when cleaning a cut, scratch or scrape. Be sure to remove all soap from the wound by rinsing thoroughly. Do not use strong soaps when providing first aid to a cuts, scratches or scrapes, as they can cause additional irritation to the injured area. Under no circumstances should you use strong cleansers or detergents, such as bleach, to clean your injury.
Step 3
First aid when there is bleeding involved:
If a cut is minor and bleeding a little more heavily, your first step is to apply direct pressure to aid the blood in clotting. Use gauze or a clean, soft cloth and apply firm, but gentle, pressure for several minutes. Elevate the injured area above the level of your heart whenever possible. If the blood begins to soak through the material, do not remove the gauze or cloth. Simply place another piece of gauze or cloth on top of the one you are currently holding and continue to apply pressure.
Cuts on the head, face and mouth usually bleed more heavily than minor cuts elsewhere on the body due to the large number of blood vessels contained in these areas. Do not be alarmed. Keep applying pressure until the bleeding stops.
Once the bleeding is under control, gently remove the cloth and begin cleansing the wound as outlined above. Bleeding may start again during the cleansing process. Use another clean cloth or gauze pad to apply pressure again when you are done cleaning the wound.
Step 4
First aid when debris is involved:
Many scrapes will have debris, such as gravel, sand or wood chips, embedded in them. Increase the strength of the stream of the cleansing water to dislodge as much debris as possible. Use a set of tweezers which have been thoroughly cleaned with rubbing alcohol to remove any debris that remains at the surface. Do not dig for any deeply embedded items. Do not use brushes or rough washcloths, as doing so will cause more damage to the skin and increase the risk of infection. If you cannot remove all the debris, seek the help of a medical professional.
Step 5
First aid with an antiseptic:
Hydrogen peroxide or other antiseptics are not needed for all wounds. Cleaning a cut, scrape or scratch with hydrogen peroxide causes additional irritation to the injury and can potentially kill off healthy cells needed for healing. Thoroughly cleaning the wound as described above is usually enough. If the cut, scratch or scrape occurred in a very dirty place or while handling items such as raw meat, a little hydrogen peroxide during the initial cleaning may be warranted. Be sure to rinse thoroughly to prevent continued irritation.
Step 6
First aid using adhesive bandages:
Opinions differ as to whether all cuts and scratches need to be bandaged. If the cut or scratch is in an area that will not become dirty, it is fine to leave it uncovered. Apply a topical antibiotic cream a couple times a day to keep it moist and fight infection.
If the cut or scratch is on an area that will easily become dirty (a hand or foot) or an area that will be irritated by clothing (a knee), apply an adhesive bandage or gauze and medical tape. Continue to use a bandage in these areas for 7 to 10 days, or until the injury is well healed.
Due to the fact scrapes dry out easily and can cause scarring, bandages are generally recommended for them. Extra large adhesive bandages are available in stores. You can also use sterile gauze and medical tape to cover the area.
Bandages hold in moisture, which aids in healing. This same moisture also provides the perfect breeding ground for any bacteria left in the wound. Always use a topical antibiotic cream when using a bandage. Change the bandage daily, or if it becomes wet or dirty. Reapply the antibiotic cream with each bandage change.
Step 7
Follow up to first aid:
Watch your cut, scratch or scrape for any sign of infection while it heals. Contact your doctor if you see any signs of infection or if the wound looks odd to you in any way. Signs of infection include:
Pain in the wound or in the surrounding area
Redness and warmth around the wound
Swelling in the area of the wound
Pus draining from the injury
Red streaks form around the injury
Fever
BLEEDING FROM NOSE
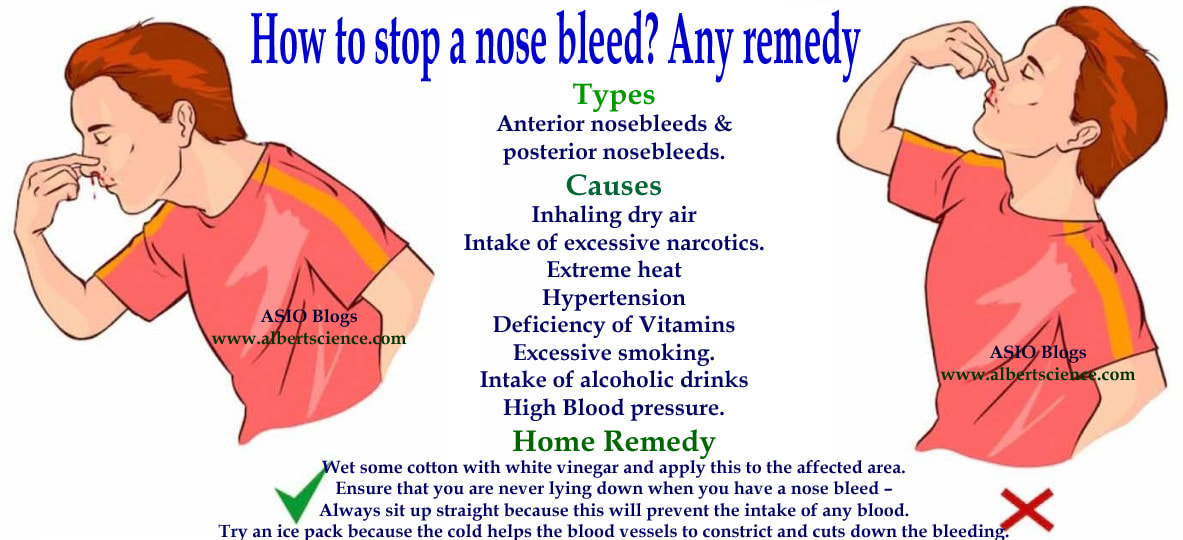
A nose bleed occurs when a small vein, along the lining of nose, bursts. Most nosebleeds look scary, but are harmless. Can be treated at home. Common in children/elderly.
Causes: Dryness, Nose picking, Blowing nose with force, Use of medications, like aspirin, Introducing objects into nose (mostly children), Injuries, Allergies, Infections, High BP. Atherosclerosis, Blood-clotting disorders, Use of cocaine Symptoms.
Bleeding from nose, Sometimes bleeding from ears/mouth too Types a. Anterior Nosebleed. Affects lower part of wall that separates nostrils, The wall or septum contains blood vessels. These can be broken by blow to nose/fingernail. The bleeding starts from front of nose. It flows outward when patient is sitting/standing. Occurs during dry season/harsh winter b. Posterior Nosebleed. The bleeding starts deep within the nose. It flows down the back of the mouth & throat. This happens even when the person is sitting/standing. Occurs in old people/those with high BP/injuries. This type of bleeding is severe/ requires medical help.
Treatment: If your nose bleeds, Sit down and lean forward. Using your thumb & index finger, squeeze soft part of nose. This part is between end of nose and the bridge of nose. Continue holding till bleeding stops- Do not stop in-between If bleeding continues, hold for another 10 minutes. If the patient is a child, divert attention by TV/Stories. Avoid picking, blowing or rubbing nose for 2 days. Place an ice pack on the bridge of nose Consult a Doctor If, The bleeding continues for more than 15 minutes. The bleeding is caused by an injury You get nosebleeds often
