Timber hitch

|

|
The timber hitch is a knot used to attach a single length of rope to a cylindrical object. Secure while tension is maintained, it is easily untied even after heavy loading.
UsageAs the name suggests, this knot is often used by lumbermen and arborists for attaching ropes to tree trunks, branches, and logs. For stability when towing or lowering long items, the addition of a half-hitch in front of the timber hitch creates a timber hitch and a half hitch, or known as a killick hitch when at sea. A killick is "a small anchor or weight for mooring a boat, sometimes consisting of a stone secured by pieces of wood".This can also prevent the timber hitch from rolling.
TyingTo make the knot, pass the rope completely around the object. Pass the running end around the standing part, then through the loop just formed. Make three or more turns (or twists) around the working part. Pull on the standing part to tighten around the object. A common error in tying can be avoided by assuring that the turns are made in the working part around itself.When making the hitch in laid rope, the turns should be made with the lay of the rope, that is, in the same direction as the twist of the rope
Rolling hitch

|

|
The rolling hitch is a knot (see also Magnus hitch) used to attach a rope to a rod, pole, or another rope. A simple friction hitch, it is used for lengthwise pull along an object rather than at right angles. The rolling hitch is designed to resist lengthwise movement for only a single direction of pull.
A common usage while sailing is for rigging a stopper to relax the tension on a sheet so that a jammed winch or block can be cleared.
A common usage while sailing is for rigging a stopper to relax the tension on a sheet so that a jammed winch or block can be cleared.
- Begin by making a turn around the object, bringing the working end back between the object and the standing part. Cross over the standing part away from the desired direction of pull.
- Make a second turn that exactly follows the first, and hence also passes between the object and standing part and then crosses over the standing part, away from the direction of pull. Make sure the second turn "tucks" between the first turn and the standing part; that is what gives this version extra grip when made around another rope
- Finish with a half hitch, moving around the object in the same direction as the first turns, as for a clove hitch.
- Dress by snugging the hitch around the object before applying load.
Marline Spike ( Liver Hitch)

The marlinespike hitch is a temporary knot used to attach a rod to a rope in order to form a handle. This allows more tension than could be produced comfortably by gripping the rope with the hands alone. It is useful when tightening knots and for other purposes in ropework. As the name suggests, the type of rod traditionally used with this hitch is a marlinespike. The advantages of this hitch over others which might serve the purpose are its quickness of tying and ease of releasing. Topologically it is a form of the noose, but in practice this hitch is not allowed to collapse into that shape. When it does capsize into a traditional noose it can jam against the rod, making it much more difficult to release. The hitch is frequently used by hammock campers to attach whoopie slings to tree huggers.
TyingBelow is a basic method of tying. The knot can also be made by using the rod itself to form the loop, but the tying method does not affect the performance of the resulting hitch.
Begin with an overhand loop. That is, a loop which the working part passes over the standing part.
Fold the loop over the working part, towards the standing part such that the standing part is visible through the center of the loop. In stiffer material the first two steps can be accomplished in a single motion by twisting the working part with the fingers until a loop forms and flops over the standing part.
Use the rod to snag a bight of the standing part through the loop. That is, pass the rod over the near side of the loop, under the standing part and then over the far side of the loop.
Before tensioning, excess slack can be removed by pulling simultaneously on both the working and standing parts. In actual use the hitch should be loaded only from the standing side.
Undesirable capsized formIf the working end is loaded rather than the standing part, the knot will capsize into an overhand noose. While this form may still hold when the standing part is subsequently loaded, it can jam badly against the rod. This is especially troublesome if the rod is not tapered.
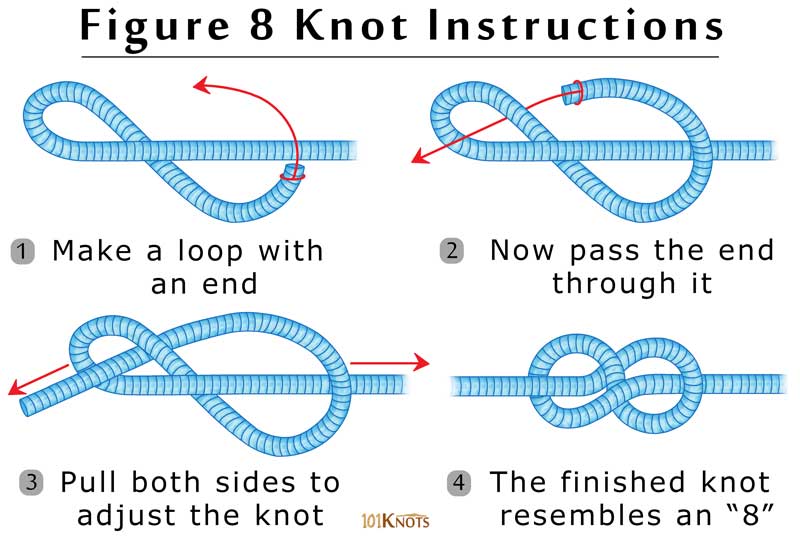
figure of eight knot

|
|
Figure of eight knot is also known as Good Turn Knot. It is used to tie a Scarf and alternate for whipping the end of an ordinary/slippery rope
square lashing

Square lashing is used to tie two spars together to take the weight when they are crossing at any angle other than parallel.
To begin the lashing the clove hitch is put on the vertical spar below the horizontal spar. Wrap the rope first over one spar, then under the other, pulling tight all the time.
On the second time round, go inside the previous turn of rope on the top, but outside underneath the spars.
After 3 wrapping, apply 2 frapping, then pull on the rope and finish it with a clove hitch on the horizontal spar inside.
Remember, Wrapping and Frapping number depends on the thickness of the spars but ratio should be 3:2
Uses:
- To prepare multipurpose gadgets
- For tent pitching
- To tie a cleat on flagmast
- To construct a trestle
- To prepare different types of bridges
Figure of Eight Lashing
|

|
Also known as round, tripod or gyn lashing.
Three spars are laid so that the centre spar goes in the opposite direction to the two outer ones.
Start with either a clove hitch or a timber hitch on one of the outside spars.
Wrap the rope neatly, but not too tightly, under and over the spars until six or seven complete turns have been taken.
Finish with frapping turns round either side of the central spar and tie off with the clove hitch.
The tripod is formed by turning the centre spar through 180o and opening out the other two spars.
